Complete Guide to Using AirPods Pro’s Newest Features
With last year’s release of iOS 17, Apple introduced new features for second-generation AirPods Pro, such as Adaptive Audio, the ability mute/unmute yourself when on a phone call, and more.

Keep reading to learn what use cases the new noise control features are designed for, and how you can control them in iOS 17 when your iPhone is connected to AirPods Pro 2 with updated firmware. To skip to a specific feature, hit one of the links below.
The new features are available on iPhones running iOS 17 when paired with second-generation AirPods Pro updated with the latest firmware. That includes second-generation AirPods Pro with the new USB-C MagSafe Charging Case, as well as second-generation AirPods Pro with the Lightning MagSafe Charging Case.
Check Your AirPods Pro Firmware
Apple does not offer instructions on how to upgrade AirPods software, but firmware is generally installed over-the-air while the AirPods are connected to an iOS device. Putting the AirPods in the case, connecting the AirPods to a power source, and then pairing the AirPods to an iOS device or Mac should force the update.
You can check your AirPods Pro firmware by connecting them to your iPhone and following these steps:
- Open the Settings app.
- Tap [your name]’s AirPods Pro.
- Scroll down to the “About” section.
- Look for the Version number.
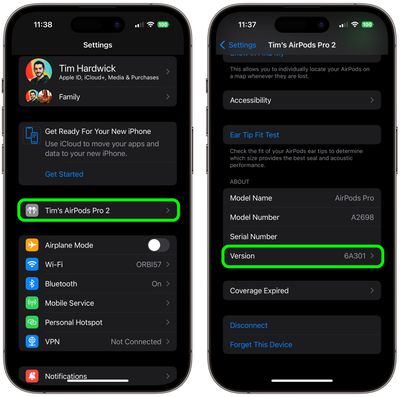
If your AirPods Pro are updated with the latest version number (6E188 as of March 2024) you’re ready to enjoy the new features in iOS 17.
Adaptive Audio
When the second-generation AirPods Pro were introduced, their Adaptive Transparency feature offered a new way to reduce loud environmental noise for more comfortable everyday listening.
Adaptive Audio, or Adaptive Noise Control, takes that approach to the next level by dynamically blending the existing Transparency and Active Noise Cancellation modes together to deliver the best audio experience in the moment. Adaptive Audio tailors the noise control as you move between different environments and interactions.

This way, loud or distracting noises surrounding, such as the sound of a leaf blower, are automatically reduced, while other noises, like the sudden beep of a car horn, will still be audible.
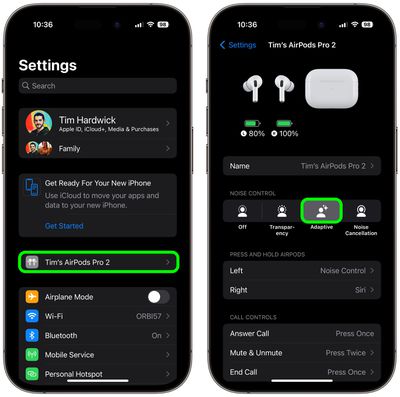
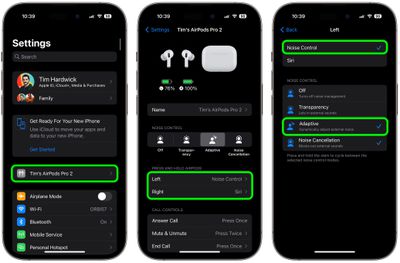
To enable or disable Adaptive Audio on AirPods Pro, connect them to your iPhone and follow one of these series of steps.
Method 1:
- Open Settings.
- Tap [your name]’s AirPods Pro.
- Under “Noise Control,” tap Adaptive.
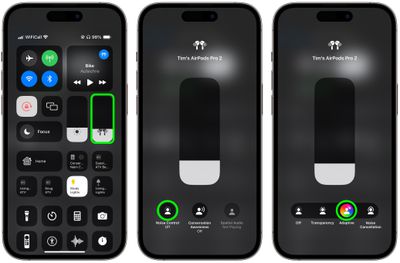
Method 2:
- Bring up the Control Center from your iPhone by swiping down from the upper right corner of the screen (on an iPhone with a Home button, swipe up from the bottom of the screen).
- Long press on the AirPods Pro volume slider.
- Tap the Noise Control button.
- Select Adaptive.
Button Control
You can also switch to Adaptive Audio with a long button press, but first you need to assign it to your AirPods Pro 2 controls, like so:
- Open Settings.
- Tap [your name]’s AirPods Pro.
- Under “Press and Hold AirPods,” tap Left or Right.
- Select Noise Control, then check Adaptive. You can also check Noise Cancellation and/or Transparency to switch between these modes using the same button, or check Off to turn off Noise Control using another long press.
Conversation Awareness
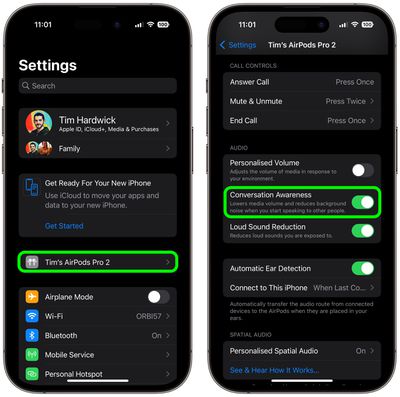
Conversation Awareness is able to detect when someone starts talking to you, and will lower the volume of the audio you’re listening to and cut down on background noise accordingly.

Conversation Awareness also helps when you’re on a call, by reducing noise around you while you speak. As a sub-component of Adaptive Audio, this feature also enhances the voices in front of you so you can hear what’s going on.
To enable or disable Conversation Awareness, connect your AirPods Pro 2 to your iPhone and follow these steps.
- Open Settings.
- Tap [your name]’s AirPods Pro.
- Scroll down to the “Audio” section and toggle on/off the switch next to Conversation Awareness.
Personalized Volume
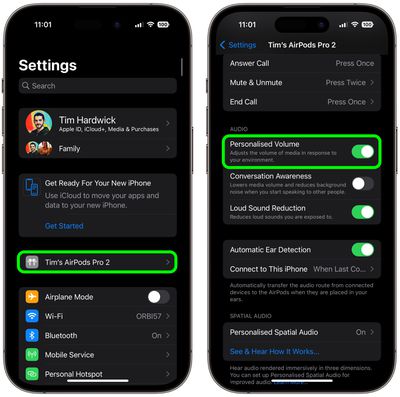
Similar to Adaptive Audio, Personalized Volume uses machine learning to fine-tune your listening experience by understanding environmental conditions and listening preferences.

Thanks to this feature, your iPhone is able to learn more about the volume that you prefer over time, and will tweak it as necessary to match your desired sound level.
To enable or disable Personalized Volume, connect your AirPods Pro 2 to your iPhone and follow these steps.
- Open Settings.
- Tap [your name]’s AirPods Pro.
- Scroll down to “Audio” and toggle on/off the switch next to Personalized Volume.
Mute Controls
Prior to the release of iOS 17, AirPods Pro did not include an assignable on-board mute function. Thankfully, that’s no longer the case. If you press the stem of your AirPods Pro earbuds, you will be able to mute and unmute yourself while you’re on a call.
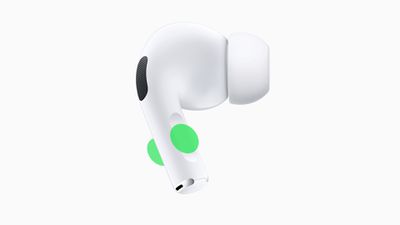
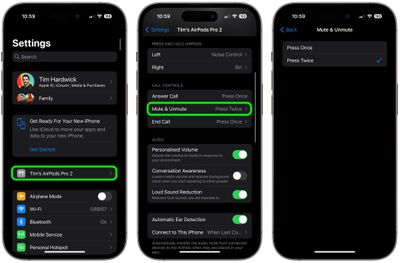
You can assign mute and unmute call controls to activate with a single press or a double press of the button on your AiPods Pro 2. Connect your AirPods Pro 2 to your iPhone and follow these steps to set your preference.
- Open Settings.
- Tap [your name]’s AirPods Pro.
- Scroll down to “Call Controls”, then tap Mute & Unmute.
- Select either Press Once or Press Twice.
Other AirPods Changes
AirPods have been criticized in the past for sluggish performance when attempting to automatically switch between Apple devices. Fortunately, AirPods Pro 2 automatically switch between Apple devices much quicker in iOS 17 and later.

And don’t forget, Apple has simplified the voice command to invoke Siri on iPhones running iOS 17 and this also works with second-generation AirPods Pro. Instead of “Hey Siri,” you can simply say “Siri” to activate the voice assistant when wearing your AirPods. You can also issue multiple queries and commands in succession without having to say “Siri” again.


